Intro to
Windows Explorer, Save As, and Muti-tasking with Excel and Word
1) Start your computer
2) Log on
3)
Put your
1. Front or back of the computer
4) Open Windows Explorer
1. Shortcut key is ÿ + E
i. Hold Window Key ÿ, then tap the letter E key
5) What does Windows Explorer do?
1. Left side of Windows Explorer:
i. This shows you the hierarchical structure of the entire computer
ii. Use this side to navigate to the drive, disc, flash drive, or folder that you would like to view
iii. You can use the + and – symbols to open and close folders and drives
1. If you click the + you will expand the folder and the folders inside your folder will appear on the left side of Windows Explorer, below your folder and slightly indented
2. If you click the – symbol your folder’s content will collapse and will not be viewable
3. Note: the + and – only adjust what you can see on the left side (if you want to view the contents of a drive or folder on the right side, you can double click the drive or folder)
iv. Double click to open item on both the left and right side
2. Right side of Windows Explorer:
i. Shows you the content of the item that it is selected on the left side
1. You can see files:
a. A Word file such as Diary.doc
i. .doc indicates that it is a file created in Word
b. An Excel file such as 2006 Budget.xls
i. .xls indicates that it is an Excel file
c. A PowerPoint file such as Sales Presenatation.ppt
i. .ppt indicates that it is a PowerPoint file
d. An Access file such as WoodenCrafts Database.mdb
i. .mdb indicates that it is an Access file
e. .doc and .xls and .ppt and .mdb are all called “extensions”
2. You can see folders
ii. The white area can be used to create new folders (discussed later)
iii. Highlight files or folders and delete, cut, or move the files or folders
6) Create New Folders, Save As and Multi-Tasking:
1. Note:
i. “Click” means one left-click with the mouse on the item being clicked
ii. “Right-click” means one right-click with the mouse on the item being clicked
iii. Double-click means very quickly left-click twice
2.
On the Left side of Windows Explorer, click on
your
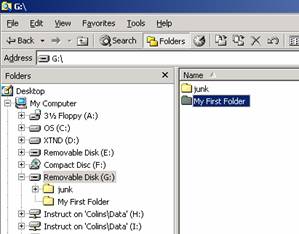
3. Notice in the picture below that the drive is lettered (G) – different computers will have different letters. In addition, notice that there are many drives in this picture that you do not see on your computer because each computer will be slightly different
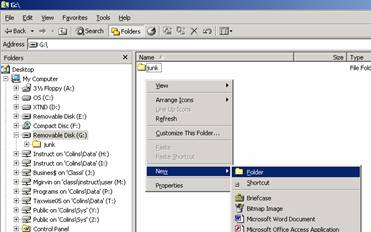
4. On the right side in the white area:
i. Right-click, point to New, click on Folder
ii.
5. When the new folder appears, the name is highlighted (the whole folder is not highlighted)
6. Type “My First Folder” as the name for your Folder
7. Hit Enter
i.
8. Notice that on the left side of windows Explorer you can see your new folder (if you do not click on the drive and hit the F5 key at the top of your keyboard).
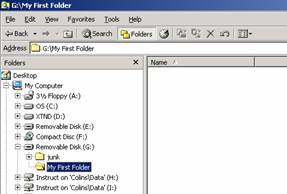
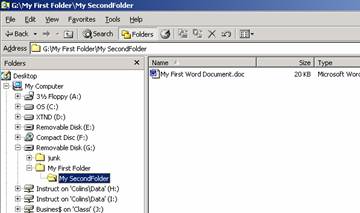
9. On the Left side of Windows Explorer, double-click “My First Folder”. You should see that the folder is open on the left and there is nothing on the right side because the folder is empty:
i.
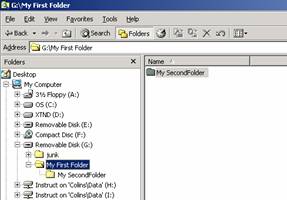
10. On the right side in the white area create a new folder inside your “My First Folder”. Name this new folder “My Second Folder”
11. On the left side double-click “My First Folder”. Notice that a plus appears next to the “My First Folder” and that the “My Second Folder” appears below.
i.
12. Look at the bottom of your screen. The bar where the Start Button is located is called the “Task Bar” (see the picture below; however, you will see different icons). What we want to notice is that an icon representing the application (or program) Windows Explorer can be seen in the Task Bar. The icon is a folder with a magnifying glass and we can see our folder name also. The icon is indented indicating that it is the one being viewed.
i.
![]()
13. Click on the Start menu and open up Excel as seen below:
i.
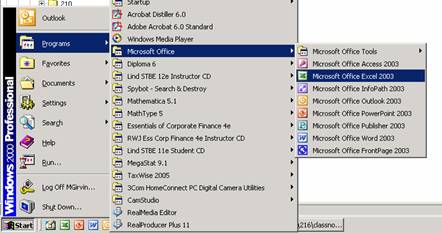
14. Using the above method, open Word
15. Your Task Bar should have three applications (programs) opened:
i.
![]()
16. To move between the three applications is called muti-tasking. In any job that you have, you will be required to multi-task and move between many different applications (programs)
17. To move between programs there are two methods:
i. Click on whichever one you would like and it move to the front.
ii. Or use the keyboard shortcut:
1. Alt + Tab
a. Hold the Alt key down, and tap the Tab key to move between programs
i. When you hold the Alt key and tap the Tab key many times, you will be allowed to move to any of the programs that you have open
18. Navigate To the program Word and type: “This class will demand a lot from me, but I will work hard and learn a great deal. The skills I learn will help me get a job and get promoted.”
19. Point to the File menu and click on Save As to open the Save As dialog box (F12 is the keyboard shortcut)
i. There are three parts to the Save As dialog box:
ii.
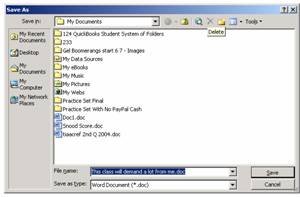
1. The “Save in” textbox drop down arrow allows you to navigate to any drive or folder
2. The “File name” allows you to change the name of the file
3. The “Save as type” allows you to change the extension
20.
Click the “Save in” textbox drop down arrow and
navigate to your “My Second Folder” folder by first pointing to and then
clicking on your
i.
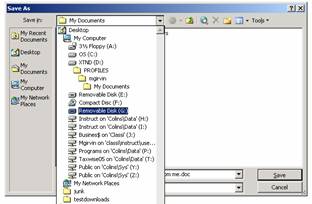
21. You will see your “My First Folder”:
i.
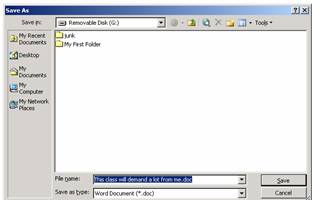
22. Double-click the “My First Folder”, or single-click and then click the Open button
23. In the “File name” type: “My First Word Document.doc”
i. Do not forget the “.doc” extension
24. In the “Save as type” the correct “*.doc” extension is already there so we do not need to change it (the “*” is a wild card that indicates that you can type a name with many characters)
25. You should see this:
i.

26. Click Save
27. Note:
i. The Save button on the toolbar does not allow you to change location or file name, it simply saves the document with the same location and name.
28. Hold the Alt key and Tap Tab until the blue box is around Windows Explorer, then let go of both the Alt and Tab keys to view Windows Explorer
29. 
30. Navigate to the Excel program
31. In cell A1 type the word “January” and then hit the Enter key
32. Using Save As, save the Excel workbook to the “My First Folder” folder with the name ”My First Excel Workbook.xls”
33. Using Windows Explorer, Navigate to the “My First Folder” folder and verify that you save it to the correct location
34. On the Right side of Windows Explorer, click on the file “My First Excel Workbook.xls”
35. With “My First Excel Workbook.xls” highlighted, Hold the Ctrl key and tap the letter X key
i. This cuts the file and temporarily grays it out. Because we want to move this file to the “My Second Folder” folder, we cut it.
36. On the left side of Windows Explorer, click on the “My Second Folder” folder, then hold the Ctrl key and tap the letter V key
i. This Pastes the file into the “My Second Folder” folder
37. Using the keyboard shortcut, Alt + F4, close each program (Windows Explorer, Excel, and Word). If you get a message that asks you if you would like to save, click “Yes”
7) In this exercise, we used Windows Explorer to create folders, save files to folders, verify that files are located in the correct location, and move files from one folder to another. In addition we used Save As to save files to the correct location and learn that there are three parts to the Save As dialog box